What's new
Photoshop Gurus Forum

Welcome to Photoshop Gurus forum. Register a free account today to become a member! It's completely free. Once signed in, you'll enjoy an ad-free experience and be able to participate on this site by adding your own topics and posts, as well as connect with other members through your own private inbox!

Recreate this effect.


awaixjvd

Member
Messages
11
Likes
2
Hi everyone

I am not that much newbie to Photoshop but still i am not an expert. That is why i am here to seek some help.
I am trying to make one of my picture like the attached image.
I tried posterize the image and setting the value to 5 and then applying gradient map and giving different colors but it doesn't make it like the one in picture. The image gets distorted and the features of face doesn't get elaborated.


russel_crowe_in_wpap_by_prie610-d35s4tg.jpg
 
I would start with the cutout filter, not posterize. The gradient map is a good next step. You'll likely have to fade in some of the original in areas with a lot if detail like the eyes.

T
 
LOL!! Yeah, I really wanted Bieber!

I was just doing something similar to what the OP posted.
 
Thanks, Sam. That was the thread I was thinking about, but was at dinner, so I couldn't look it up. Yup, I think your method (in that thread) was closer than mine.

However, I actually regard both of our methods only as starting points because I don't think the shapes in this image look like either of our methods. My suspicion is that they were probably were drawn in by eye, using the pen tool, based loosely on these as starting points.

Best regards,

Tom
 
Yes, the shapes are different, but I still believe that they were made individually using the Polygonal Lasso Tool.
 
OK, in Photoshop, use your Pen Tool.

This thread has fascinated me when I saw it and I wanted to try this technique myself. I drew my shapes mainly with vertical, horizontal and diagonal (45 degree lines). With this way of working, I even developed my own personal look.
I spent 6 hours on this job and at the end I counted 65 layers.

DSCN3612myportrait+popart1445pix.jpg
Click to enlarge
 
Excellent Chris! I love these kinds of projects. I myself did several after the Michael Jackson tutorial. What tool did you use for the shapes?
 
i appreciate everyone who replied to this thread and gave their own efforts and ways. I tried doing the "posterize" method and also tried doing the "cutout" filter as well and then applying gradient maps. The only problem with that is:

* the picture should be very high quality
* the lights and shades should be very precise
* it discards the facial details such as that of mouth, face and eyes.

The only possible way that i was thinking of, same as told by "chrisdesign" that is the only possible way for you. One has to draw the lines and shapes on whole picture and then applying gradient map is very easy. It has to be so many shapes and so many layers. It is a time taking process indeed. I would try it some other time.
 
So awaixjvd, are you satisfied with the answers you received or do you feel there should be another way to accomplish the effect?
 
i appreciate everyone who replied to this thread and gave their own efforts and ways. I tried doing the "posterize" method and also tried doing the "cutout" filter as well and then applying gradient maps. The only problem with that is:

* the picture should be very high quality
* the lights and shades should be very precise
* it discards the facial details such as that of mouth, face and eyes.

The only possible way that i was thinking of, same as told by "chrisdesign" that is the only possible way for you. One has to draw the lines and shapes on whole picture and then applying gradient map is very easy. It has to be so many shapes and so many layers. It is a time taking process indeed. I would try it some other time.


The original image size is 2000x3000 pixel, 300 dpi.
this is a small detail in the first color version to check the quality.

DSCN3612myportrait+popartDetail.jpg
Click to enlarge.
 
This is a really a fun area to explore. Although I recommended using the pen tool earlier in this thread, and had in mind using the way Chris did, to be honest, I didn't have the time to play with it myself.

OTOH, back in May 2013, I used the less labor intensive artistic cutout filter (masked away from the eyes) to produce a different look, almost like a geometric face-painting. I don't think I posted it back then, but if I did, feel free to ignore me, LOL.

T
 

Attachments

  • artistic_cutout_filter-highpass-tjm01_ps01a-04_acr_clarity_plus_USM_rEQ2p5-00_orig.jpg
    artistic_cutout_filter-highpass-tjm01_ps01a-04_acr_clarity_plus_USM_rEQ2p5-00_orig.jpg
    197 KB · Views: 30
  • artistic_cutout_filter-highpass-tjm01_ps01a-04_acr_clarity_plus_USM_rEQ2p5-03_add_back_some_of_o.jpg
    artistic_cutout_filter-highpass-tjm01_ps01a-04_acr_clarity_plus_USM_rEQ2p5-03_add_back_some_of_o.jpg
    274.4 KB · Views: 30
From my original link, and its the same artist as the OPs posted image.

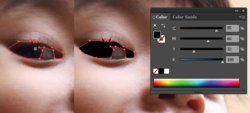
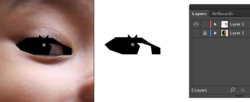
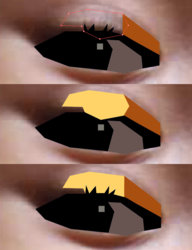
In the original photograph, the iris, purple and eyelid edges have a dark color and it's clear to where you can define the edges of this shape. I will trace this section, this time I will use the Pen Tool (P).
wpap_6.jpg[h=3]Step 3[/h]Of course, the highlight you've drawn in the first step will now be hidden by the new layer. To make it visible, while the iris and eyelid still active, you will need to rearrange your shapes by going to Object > Arrange > Send to Back. At this stage, the "white" of the eye has a clear edge, so you can go ahead and create this shape to complete the eye. As easy as this is, it's about to get more difficult.
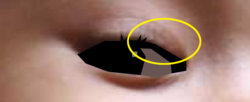
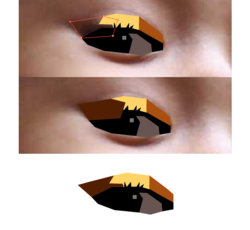
wpap_7.jpg[h=2]4. Create More Complex Shapes[/h][h=3]Step 1[/h]We will now trace the closest area next to the previous objects. Unfortunately, we have here no vivid and clear boundary between the dark and bright area. This makes it more difficult in creating the shapes for the portrait.
wpap_8.jpgFacing such a case, intuitively, you have to be confident enough to determine the boundary for the shape. A solid grasp of the human face and a good image to work from can help a great deal here.
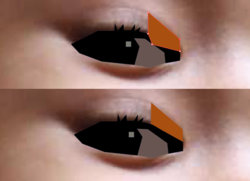
Create your straight edged shape along the corner of the eyelid, making sure you overlap the shapes for the eye so it doesn't leave any gaps between the shapes. Then as before, rearrange the shapes by going to Object > Arrange > Send to Back.
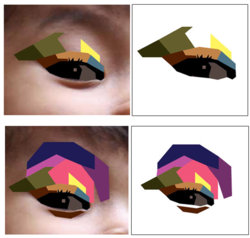
wpap_10.jpg[h=3]Step 2[/h]We come to the same problem for the next shape; no visible boundary for the shape. Again, with confidence you will need to create the shape. Notice how I've created a not-so-square shape and distorted the shape so it shows the darker shadow cast from the eyelashes. You will find similar shapes throughout which use this same method.
wpap_11.jpg[h=3]Step 3[/h]This is a problem you will come across over and over again. It may be a boring and tedious process, however it is the only way to create a proper WPAP composition. You may think of using Posterizing or Live Trace, but no, I don't use those facilities as they do not create the same style.
wpap_12.jpg[h=3]Step 4[/h]We are still going to find the unclear and even invisible boundaries for each potential shape. The best way to overcome this problem is through the experience of repeatedly creating artwork in this style.
The process is duplicated throughout:

  • Draw the shape with the Pen Tool (P) using only straight lines.
  • Fill with the appropriate color given it's exposure to light.
  • Select the shape and rearrange it by going to Object > Arrange > Send to Back.
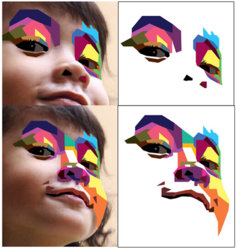
All portraits will use a different series of shapes, so I can only show you the shapes I've drawn for Ola's portrait. I start by drawing further shapes around the eye area.
wpap_13.jpg[h=3]Step 5[/h]Then I work on the shapes for the other eye and nose. I then connect these areas with shapes and add white shapes for areas under extreme light.
wpap_14.jpg
 

Back
Top