The next 4 steps cover how to add lighting details.
Duplicate the 'button color layer. Name this layer 'large refraction'. Press the d key to reset your Fore & Background swatches. Then press the x key to switch their order around. Press Alt/Option+Delete to fill the shape with white.
Now unlock the layer's transparency, by unticking the checkered box at the top of the layers palette; we need to blur this layer. Apply a Gaussian blur of 10 pixels. Then check to make sure the layer's Blend Mode is set to Overlay.
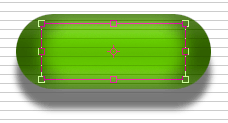
Now go into the Edit menu and select the 'Transform/Scale' command. Hold down the Alt/Option and the Shift keys, then click on the top right corner control node and scale the shape down (inward) until all of the corner control nodes are inside of the pill shape (see example image). Release the keys you were holding down. Now grab the top center control node and drag it downward until the highlight shape is only about half the height of the main pill shape. Then press Enter/Return to apply the scale changes.
Hold down the Shift key, and press the down arrow key one time; or basically, move it down until it's sits just above the pill shape's bottom edge.
Ok now, without going into too many technical explanations, we're going to create a bunch more of these types of highlights; as well as shadows and some reflections. Collectively, they will give the pill button it's 3D characteristics, and help define it's overall shape, and realism, to the viewer's eyes. There's a lot of these to create (about 13), so let's just run through making them, and I'll explain them a little more after we're done.
| 3D Characteristics - highlights, shadows & reflections |
Get ready for a quite some steps that c over this particular part of the tutorial.
| Step 1 - Interior Highlights |
Ctrl/Cmd-click the 'button color layer to select the button shape, then create a New Layer (Ctrl/Cmd+Shift+n) at the top of the palette; move it there if you have to. Name this layer 'interior highlights'. Grab the Airbrush and change it to these settings:
- Round shape
- 65 pixels in size
- 0% Hardness
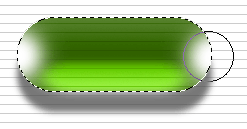
Line the brush up halfway over the selection's left side, and in the center of it's height. The brush should be half inside and half outside the selection. Press your mouse button once, in a quick but firm motion. You should end up with something similar to the example image on the right. Do the same for the other side of the selection. And press Ctrl/Cmd+d to Deselect when you're done.
Pick the rectangle selection tool (m or shift+m until it's selected) and create a selection just around the highlight on the left side. Then press the v key to select the move tool. Hold the Shift key down and hit the right arrow key 2 times (= 20 pixels). Now do the same thing again with the right highlight; but move it left of course.
Deselect, and change the layer's Blend Mode to Soft Light, as well as drop the Opacity down to 50% (press the number 5 key). Are your eyes starting to see more clearly how creating multiple layers of highlights will help produce the 3D characteristics of the pill shape? If not, don't worry, you will soon.
Once again, Ctrl/Cmd-click the 'button color layer to select the button shape, then create a New Layer at the top of the palette; or move it there if need be. Name this layer 'end refractions'. Grab the Airbrush again and change it to a smaller size; around 45 pixels. Use a 50% soft-edged brush, not a hard brush.
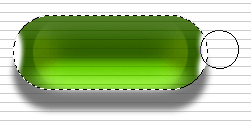
Make sure your Foreground color is still white, then apply a small stroke on each side, just inside of the selection. But make sure that these paint strokes are outside of the 'interior highlights' you just did. These highlights should not look like they're part of the other ones, they are to be separate, and just cover a small area near the left and right edges of the pill shape (see example image). When you're done that, Deselect. Then use the Blur tool (r or shift+r until selected) and soften the outer edges just a bit. Don't over soften though, just a quick brush of the tool over the outside edge. Change this layer's Blend Mode to Overlay.
Once again, Ctrl/Cmd-click the 'button color layer to select the button shape, then create a New Layer at the top of the palette; or move it there if need be. Name this layer 'shadow top'.
Press the m key, and hit your down arrow key 2 times. Fill the selection with black. Then hold down the Shift key and hit your down arrow key 1 time. Now hit Delete, and then Deselect.
Change this layer's Blend Mode to Soft Light, and reduce the Opacity to 50%.
| Step 1 - Bottom edge highlight |
Duplicate the 'shadow top' layer. Rename this layer 'bottom edge highlight'.
Press Ctrl/Cmd+i - to invert the black to white. Then Ctrl/Cmd-click the 'button color layer to select the button shape, and under the Edit menu choose 'Transform/Flip Vertical'. This highlight should now be in exactly the opposite position as the 'shadow top' layer is.
Make sure this layer's Blend Mode is set to Soft Light, and change the Opacity to 75%.
Once again, Ctrl/Cmd-click the 'button color layer to select the button shape, then create a New Layer at the top of the palette; or move it there if need be. Name this layer 'edge refraction'.
Choose the Gradient tool. Click on the Linear gradient button in the Options bar. Then press the d key to reset your Fore & Background swatches. And then press the x key to switch them around. Apply the gradient tool to the selection from top to bottom - white on top, black on bottom.
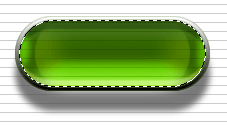
Now open the Selection menu and choose 'Modify/Contract...'. Contract the selection by 4 pixels. Press Delete to get rid of the middle section, leaving us with just a 4 pixel gradient outline of our pill button. Deselect.
PAGE 1 / 2 / 3 / 4
Copyright © Mark Anthony Larmand
 Now go into the Edit menu and select the 'Transform/Scale' command. Hold down the Alt/Option and the Shift keys, then click on the top right corner control node and scale the shape down (inward) until all of the corner control nodes are inside of the pill shape (see example image). Release the keys you were holding down. Now grab the top center control node and drag it downward until the highlight shape is only about half the height of the main pill shape. Then press Enter/Return to apply the scale changes.
 Line the brush up halfway over the selection's left side, and in the center of it's height. The brush should be half inside and half outside the selection. Press your mouse button once, in a quick but firm motion. You should end up with something similar to the example image on the right. Do the same for the other side of the selection. And press Ctrl/Cmd+d to Deselect when you're done.
 Make sure your Foreground color is still white, then apply a small stroke on each side, just inside of the selection. But make sure that these paint strokes are outside of the 'interior highlights' you just did. These highlights should not look like they're part of the other ones, they are to be separate, and just cover a small area near the left and right edges of the pill shape (see example image). When you're done that, Deselect. Then use the Blur tool (r or shift+r until selected) and soften the outer edges just a bit. Don't over soften though, just a quick brush of the tool over the outside edge. Change this layer's Blend Mode to Overlay.
  Now open the Selection menu and choose 'Modify/Contract...'. Contract the selection by 4 pixels. Press Delete to get rid of the middle section, leaving us with just a 4 pixel gradient outline of our pill button. Deselect.


