Photoshop Tutorials
Selection Tools
| Magnetic lasso selection tool |
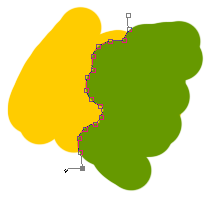
 The Magnetic Lasso tool can create a selection along the lines formed by 2 contrasting colored edges, within an image; even a photo. Like in this example image. There is a distinct hard edged line between the 2 colors used. And this tool can "automatically" create a selection along that line, when you drag the point of the tool along the edge where the 2 colors meet. All that's needed from you the user is that you setup a few options beforehand, so the tool will behave to the degree that you need it to at that moment.
 This example image to the right now shows what the selection line would look like after applying the tool to the image. And of course, you would close off this selection just like we talked about for the previous lasso selection tools.
Special options for this tool include:
Width - of pixels on each side of the meeting line that will be considered for selection by the tool. 1 to 40 is the range for this option.
Edge Contrast - the lasso's sensitivity to contrasting edges in the image. The higher this number, the more sensitive the tool will be. 1% to 100% is the range of this option.
Frequency - specifies the rate at which the tool sets "fastening points" (those square dots in the example image). 0 to 100 is the range for this option. A higher value "anchors" the selection border in place more quickly; i.e. produces more square dots, which makes the selection more complex.
T I P The Lasso and Polygon Lasso tools have an extra ability, that the others do not have. Whenever you're using them, you can switch between them "on-the-fly", by holding down the Alt/Option key while drawing out a selection. Try this now...
Start out using the normal Lasso tool, drawing out a selection. Then press and hold the Alt/Option key down. Release the mouse button and click-and-drag the tool, instead of drawing freely; like you did when using the Polygon Lasso. So long as the Alt/Option key is held down, you can use either tool as if they were one tool, with the abilities of both tools. That's pretty cool, and pretty handy!
| Magic wand selection tool |
 This selection tool is also very easy to both understand and use. Pick this tool now.
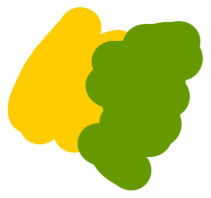
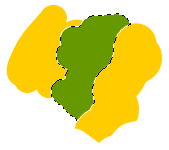
Use the Airbrush to create a similar colored image to the example shown here. When you're done, click the Wand tool anywhere within the green colored area (or whatever your center color is). You should see that the tool selects just that one color. The only real option for this tool is "Tolerance". This determines how strong the Wand's sensitivity is set to.
Higher numbers mean it will choose shades of green, not just the pure color itself. And lower settings will make the tool be very specific in it's function; i.e. a setting of 0 will make the tool select only the purest pixels of the color you click on.
A medium-low tolerance setting is usually best, because it will produce a slightly soft edge on your selected area. Too low a setting can produce a really jagged edge, and too high a setting will give you a fairly fuzzy edge around the selected area; which will usually include some of the surrounding color that you may not want. But as with all things graphic, every situation calls for something different. So you'll most likely be testing a few different settings for this tool to get exactly what you need from it.
T I P If you want my honest opinion of this selection tool, I rarely use it myself. For quick, rough selections of large areas, the Wand may work fine for you. But, for more precise selections of this nature, instead of the Wand tool I'll usually get much better results from using the "Color Range..." function under the Selection menu. Play with this function yourself on the image you created above, and I think you'll soon agree with me about it; once you've compared the results of the two methods (and time invested).
Go ahead now and experiment a while with each of these selection tools we've covered. Get a good strong feel for how they each perform under the same, and different situations, where you need to create selections - both from scratch, and from within an existing image (such as a photo).
The last selection tool we'll talk about is the infamous Path Tool - the cause of many a headache among new Photoshop users. But hopefully we'll fix that here with some easy-to-learn techniques.
| The Path Tool - an introduction |
One of the main reasons why this particular tool is harder to learn and understand comes from the fact that it has it's own sub-group of tools that are used to perform the various Path creating and editing functions. But Adobe has made it easy to learn this tool actually. The button icons designed for each sub-tool show graphically what the tool's function is. And using these tools is really a lot easier than most people think. But I can understand how this tool may appear intimidating to new users.
 The first of the many Pen tools, is the normal path creating pen (the top icon in the menu). It is the main Path tool you'll use. The other pen tools can be called upon by holding quick-keys while using this main pen. This tool creates a path by using the same technique that you used for the Polygon Lasso selection tool - by clicking on the canvas to start the selection, then moving the mouse to the next point and clicking again. Doing this repeatedly until the shape of your selection is created. Photoshop will automatically add the connecting line between each new point added. And you don't even have to open the Paths palette either. Just stay in the Layers palette and start working with the Pen tools.
Paths are independent of your normal document structure, and are not confined to the same rules as the layers and channels are; you'll understand this more as you learn to work with them.
The next pen tool in the menu is the Freeform drawing tool (it has the wavy line coming from the pen tip). Just like using a brush or pencil, you can use this tool to draw on the canvas and create a path; this is really useful for creating organic shapes. And since paths can be "Stroked", as well as "Filled", you do not have to actually close a path, in the same way you should a selection (like when using the Lasso selection tool).
Paths can be left as just an open-ended line. If however you do want to close your path, just hold the normal pen tool over top of the starting point of your path and click your mouse. And with the Freeform pen, just end drawing your line at the same point where you started drawing it. You'll see that when you hold the tool over the starting point of a path, a small circle appears beside the pen cursor image. This signifies that the path can be closed at that point.
Keep in mind though that if you do not close your path, and you Fill the path with a color or texture pattern, then Photoshop will temporarily draw a straight line from the last point in your path directly to the first point - even if that means drawing it across the middle of your path shape. The temporary line that's added though will not actually be added to your real path. So in most cases, it's just a good habit to close your paths yourself.
 The next 3 pen tools in the menu are for path editing. The first 2 are for adding to, and subtracting from a path. Using these tools is simple. When your mouse is over a line segment of the path, a plus sign is added to the cursor. If you click at that point, a new editing node (the small squares along the path) is added to the path. When your mouse is held over an editing node, a minus sign appears beside the normal tool cursor. Clicking on the node at that moment, will remove it from the path.
 NOTE Removing an editing node is not the same as deleting a node. Removing a node leaves your path closed, and just gets rid of that node. However, clicking on a node with the point selection tool and pressing the Delete key will create an opening in your path; because the line segments that come before and after that editing node will also get deleted.
The way to create an opening in your path, should you want this, is to add new nodes to the path just in front of, and behind the node you need to delete.
The last path editing tool in the menu is the "Convert Point" tool. This tool simply turns a normal "fixed" editing node into one that has beziere control bars. And all that means is... you can drag these control bars around and make your path line bendable and curvy. This function can also be created at the same time as you're initially drawing your path. To add curve controls (that's what I call them) to your path, just hold down the mouse and drag it for a second, when adding a new point to the path.
So here's the steps you'd take to create a square with one corner that has curve controls:
- Choose the normal pen tool. We're making a square path; don't worry about it looking perfect.So click to create the first corner node; make it the top-left corner.
- Click to create the top-right corner node.
- Click to create the bottom-right corner node.
- And now for the last corner, bottom-left, click and hold your mouse down, and drag it to the left for just a few pixels, then release the mouse button. You'll see that as soon as you start dragging the mouse, the curve control handles appear. At that point, release your mouse button.
- Click on top of the first corner node again, to close the path. When you've completed the shape for your path, and are ready to close it off, hold the tool over top of the starting node in your path, you'll see a small closed circle image appear beside the normal path cursor. This indicates that clicking on that node will close the current path.
Now we're going to use this square path to learn how we can work with all of the previous path tools, but not have to pick the tools from the menu. We'll use short-cut keys instead, to "quick switch" to them.
The following short exercise shows how we can use all of the path editing tools in one go:
- Hold down the Ctrl/Cmd key, and click on the square path you created, then release the Ctrl/Cmd key. When you closed the path before, it became deselected, so we're just reselecting it again. (holding the Ctrl/Cmd key down allows us to select parts of our path. So when I say the word "select", you'll immediately know to hold that key down before following through with the instructions).
- Hold down the Ctrl/Cmd key - you'll notice that the cursor changes into a white arrow; also known as the "Direct Selection" tool. Now click on the top line of the square, then release the Ctrl/Cmd key. Then press your delete key. We've now re-opened our path.
- Now hold the mouse over the bottom-right corner node. You'll see that the cursor becomes a pen with a minus sign beside it. That means that if you clicked on that node, you would remove it. But don't do that. Instead, hold down the Alt/Option key. Notice that the cursor again changes - into the "Convert Point" tool. Click and hold down the mouse button on the corner node, and drag the mouse to the left a little, then release. And then release the Alt/Option key as well. We've now made this corner capable of being rounded, just like the bottom-left corner is.
- Again hold down the Ctrl/Cmd key, and pretend you're using the Rectangular selection tool - drag a selection marquee around the 2 bottom corner nodes. Continue to hold the key down, then click and hold the mouse button down on the bottom line segment, while dragging it downward slightly. Then release your mouse, and the Ctrl/Cmd key.
- Select the top-right corner node and move it over toward the left a bit. Stop around the halfway point. Then do the same with the top-left node, but don't drag it with the mouse. Instead, hit your right arrow key 10-15 times -- if you hold the Shift key down at the same time, the selected objects will jump 10 pixels each time you press the arrow keys.
- Select the bottom-left corner node. When you do, the curves control handles should appear. Hold the Ctrl/Cmd key while dragging the ends of the handles outward and away from each other. When you're done, release the Ctrl/Cmd key, and your mouse button. We're trying to round off the corner some more. Do the same with the bottom-right corner node.
- Now, hold the cursor over top of one of the side line segments; near it's middle. When the pen cursor with the plus sign appears, click the mouse.
- And finally, we'll close our path again. Click on the top-right corner node, then hold the cursor over the top-left corner node. Notice that the cursor changes to a pen with a small closed circle beside it? Now click on the node and the path will again become closed.
Well I hope this has helped show everyone that the path tool is not something to be mystified or afraid of. And that it's actually one of Photoshop's most powerful tools - when used for good, and not evil.
Copyright © Mark Anthony Larmand
For help, advice, tips and tricks, challenges, feel free to visit our
PAGE 1 / 2


