What's new
Photoshop Gurus Forum

Welcome to Photoshop Gurus forum. Register a free account today to become a member! It's completely free. Once signed in, you'll enjoy an ad-free experience and be able to participate on this site by adding your own topics and posts, as well as connect with other members through your own private inbox!

How do you create "starbursts"??


amarkarian

New Member
Messages
3
Likes
0
Hi,
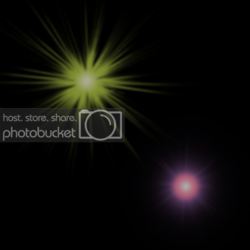
For my latest graphic design project I need to create "starbursts" like those shown below (the pink and green ones on the right, the smaller brighter ones to the left). I have CS3, but I am a bit of a novice so I have no idea how to do this, not to mention, I have no idea what they are called!. Anyway, anyhelp would be much appreciated,
thanks
alex


Andreas-Dobler-3.jpg1AlbertOehlen.jpg
 
There's no easy and quick "do this" for perfect star burst but this will get you started.
In a new layer create a gradient.

Filter Distort Wave (Play around with the settings)

Filter Distort Polar Coordinates
 
:eek:

Whoa
... haven't done this in a long time... doing it in PS while tapping this and its a long one.... please be patient with me... I'm lousy in writing tutes....


1. Create a new document. The dimensions must be equal, so let's use 250x250 pixels with a White Background.

2.
Create a New Layer. Then draw a rectangular selection down the entire left half of the canvas, fill with black, and Deselect. You now have a B&W image - left half black, right half white.

3.
Open the Filter menu now, and go down to Stylize>Wind... Method: Blast Direction: From the Right. Apply the filter.

4.
Press Ctrl+F 5 times. This applies the filter a total of 6x. This will make the black section a lot smaller. So now we have to move this layer to the right; more into the middle of the canvas again.

5.
Click on the Move tool, hold down the Shift key, and press the right arrow key 5 or 6 times. You'll notice that there's a white area now on the extreme left. Use the Rectangular selection tool to select that area, and refill it with black. Deselect .

ex1.jpg

6.
This image is how yours should look just before using the Motion Blur filter on it.

Now we'll apply the "Motion Blur" filter. Use these settings in the filter: Angle:
0 Distance: 160 ...... Apply the filter. Your image should now look much smoother than the sample image here.

7. Now we need to rotate our entire document. Rotate the entire Canvas 90 degrees counter-clockwise (90°CCW). Image menu/Rotate Canvas.../90°CCW.


8.
The secret recipe for SPECIAL EFFECTS - the Polar Coordinates filter! Open the filter and set it to "Rectangle to Polar". Apply the filter. Your starburst cookie cutter is born......

9.
To make the starburst effect easier to use within other images, and to manipulate in general, we're going to extract the starburst transparent area from the black surrounding it.

First we need to get rid of extra data that is hiding beyond our canvas's borders. Press Ctrl+A
..... and under the IMAGE menu, choose Crop..... Now Ctrl+Click the starburst layer ICON , then press Ctrl+Shift+I to invert the selection.

Create a New Layer and fill the selection with white, then Deselect. Now click on the Background layer and press Ctrl+I to invert it's color to black.

Your choice to delete the original black layer with the transparent starburst on it; the one we started with - if you want to keep it, hide it... You can now also give your new white starburst layer a name - "starburst".


10.
And last, create a New Layer above the starburst layer, and fill this layer with the colour of your choice. Then change it's Blend Mode to one of these: Overlay/Softlight/Color Burn/Color. I chose overlay for this one.

starbusrt.jpg


Here's just a few things you can do to tidy up the document, and enhance the effect a little more.

1.
To strengthen the inner center spot, while softening it at the same time.

Duplicate the 'starburst' layer and under the 'Distort' menu, apply the "Pinch..." filter, set to 100%. NOTE : This setting is up to your preference on how much you want to strengthen the center spot.

Under the FILTER >Other>Maximum.... Set it to 2 pixels and apply it. Now press Ctrl+E to merge the 2 layers together OR make a copy of starburst and merge with the just created layer ( You keep the original starburst layer). Name the new starburst layer

2.
To strengthen the impact of the effect even more, try this:
Apply the "Pinch..." filter again to the 'starburst' layer, and use 100% again. Setting is up to your preference.

3.
You're going to lose some detail after applying the Polar Coordinates & Pinch filters. So if you'd like to make the image crisper, and get some of the finer detail back (just how much detail is up to you) apply the "Unsharp Mask" filter to the 'starburst' layer (Filter/Sharpen/Unsharp Mask...).

I used these settings on mine: Amount= 50% Radius= 0.5 Threshold= 0

4. To get a muti-colored starburst... create a new layer above the starburst... fill with second color and set to OVERLAY.

5. To add more spikes, create a copy of starburst, CTRL+T .... and rotate it to get the desired result.

7. To have a different color intensity to one sunburst within a sunburst , CTRL+T.... and drag it bigger or smaller.

FOR OTHER LOOKS.... sorry... you have to experimant on that one..... but there are a lot of ways to change the look.....

8,
Using the starburst in other images or documents....

Now that your final starburst image is on it's own layer, you can just open your other document, and drag the 'newstarburst' layer into it. Once on it's own new layer, move it's layer up or down in the layers palette to suit your purpose for it in your image. And you can now also Move the starburst anywhere you want within the new document.

Then to add some colour to the effect
, create a New Layer right above the 'starburst' layer. Ctrl+click the starburst layer to select the starburst shape, then under the SELECT menu choose Modify/Expand. Expand the selection 2 pixels. Now fill it with the same colour you're using for the document's background colour. Then set the layer's Blend Mode to COLOR. And finally, link these 2 layers together; so they can be moved around together as one.

OR SIMPLY..... link all the needed layers of the your STARBURST file and DRAG INTO NEW DOCUMENT.....


OOIIIIIIII.... lol.... I hope I got it right.... just pm me if you need clarification on things....

Here's the starburst in use, in a space scene created entirely in PS many years ago... I use the starburst on a lot of my space scenes in fact, I've used my first created starburst layered copy in many of my early space scenes....

God'sCreation.jpg

Hope this helps.

ENJOY.......
 
Last edited:
NOTE: It's not quite like the bursts in your post.... but if you create an image for step 5 with less spikes ( this means you dont use the WIND BLAST but create the spikes manually ) and continue the procedure, you might be able to get the "BURST" look you need...........

You can even delete some of the "rays" to get the look in your posted image....
 
Last edited:
As for your smaller starburst...

It's all in layering and different brush sizes.

Top most layer .... solid round brush , white ...
next layer.... bigger brush (twice the size of the first) with softer edges different color.
next layer.. an even bigger brush with soft edges. different color

lather rinse repeat if needed...

play with the modes and opacities of the lower layers. You can even make a copy of a lower layer and move to the top.

To get a better gradient on the brush spots.... CTRL+click layer icon to select the layer image... SHIFT+F6 to change settings feather (ex. 20 )... CTRL+SHIFT+I to invert selection and hit delete.....
 
Here is a super simple way to create an effect similar to those stars. First I will post my picture of what I made in 5 mins then explain how I did it.

Stars.png
1) Make an image 800*800 and filled it with black.
2. Get the brush set called Stars and Blinks (its one of my favorites) Actually it can be found here: How to create Christmas background with snowflakes and stars in Photoshop CS5
3) Once you have loaded the brushes you can kind of see which you can use that are similar to the effect you want to achieve.
4) Make each brush on a new layer and use Filter>Blur>Gausian Blur I used setting 3.1
5) Double click on the layer in the layers panel and choose Gradient overlay. For the green star set the overlay to Radial and 2 colors. use the color picker to pick the colors from your original picture. Same for the pink star only use 3 colors. It must be on separate layers though to use the gradient.
 

Back
Top